Footstool Makeover


Last week the girls and I took a walk to visit both of the neighborhood thrift stores. We needed to buy a tie for Daddy, who is an ecologist and has a closet full of classic plaid button-ups and cargo pants that can transition easily from the classroom to the field easily, but not so many formal outfits. Until last week he had three ties, none of them quite right for the event he was going to.

In classic thrift-store fashion, we did find an Italian silk tie for 50 cents that worked perfectly, and we also came home with other items we hadn't been looking for. I found a very ugly little stool that was crying out for a makeover hiding inside an entertainment center at the Salvation Army. Since furniture was all half-off that day, I decided that for $3.50 I could take it home and fix it up. Annie happily carried it on her lap in the stroller all the way home, chattering about how she would use it to play with her dollhouse.

The stool was so ugly that I second and third-guessed myself both in the store and once I brought it home. The brown rug-like cover had flecks of what looked like carpet padding peeking through. However, it didn't smell bad, it was sturdily built, and it was so small that I was pretty sure that I could transform it in a day or two.

That day I took off and sprayed the legs with black Rust-Oleum semi-gloss paint (which, it turns out, is a lot better than the generic kind), and stripped off the hideous brown rug covering. Then Annie and I dug into my yarn stash, and finally agreed on a ball of tie-dyed cotton that I unraveled from a sweater last summer. I spent longer knitting the cover than I initially planned, but a little more than a week after I started the project, it's finished! I love projects like that.

After I knitted a big oval to cover the stool, I made a few flowers and a butterfly from the patterns in 100 Flowers to Knit and Crochet by Lesley Stanfield. I sewed them on with clear thread, and embroidered a few stems and leaves. These served not only to decorate the stool, but bring in some other colors and hide a few small holes from the increases in the knit fabric.

Annie was very excited when she woke up this morning and discovered that I'd finished the stool for her. It is exactly Annie-sized!

And, best of all, it works for its indended purpose! Annie can finally reach the attic level of her dollhouse.

This is the kind of project that I really don't see making to sell, since even a tiny stool like this still took 8 days to finish. But if you live around Bloomington, I'd love to teach you how to do it yourself!

Ram's Horn Belt

Sorry for the absence from the blog these past few months. Since having a second baby back in August I've been struggling to find the right balance between keeping house well, serving others, and selling my fiber arts, all the while loving my husband and daughters. It's a difficult balance and this blog is low on my list of priorities. That said, I'm pretty excited to have a couple new things to post here! I've been very busy with special orders, but in between those I managed to weave a pretty cool new belt for my husband.

There is a traditional Turkish pattern that is very popular in card weaving called "Ram's Horn." It is really cool, because it features two colors spiraling around each other, which is a kind of tricky thing to pull off. It requires weaving with two packs of cards, sometimes turning them in the same direction and sometimes in opposite directions. My first attempt at weaving this pattern didn't go so well:


Frustrated, I set the loom aside and asked for help on a Ravelry forum. One lady very kindly gave me the contact information of a friend who is a tablet weaving instructor. Through an e-mail correspondence, the instructor helped me figure out what I was doing wrong. It took several tries and many hours, but I finally got the pattern to turn out right. I tiredly raised my fists and cheered. Quietly. Because it was nap time.

Now it is all finished, except for some end reinforcement and the metal tip that I still need to buy to help it slide through the buckle properly. That hasn't stopped Collin from wearing it the last three days though. He likes it, and I like it, and that makes me very happy.

I am ordering some new belt buckles and tips, so soon I should be able to offer these for custom order. This belt is made with linen yarn, which makes it extremely strong but a little fuzzy. For a smoother look, I could make it in cotton yarn. Suggested Retail: $20.

Gumball Machine!

I've been very busy for many weeks now getting ready for the Bloomington Handmade Market. This will be my second year at the BHM, which is one of the best local craft shows of the year. Besides being furiously busy making stock to sell, I've been putting a lot of thought into how to display my things in an attractive way.

Last week, I decided that I had to have a gumball machine. I was looking at the brightly colored felted bouncy balls I'd just finished, and thinking how much they looked like gumballs in the1-gallon glass jar I stored them in. I started looking into getting a gumball machine, searching Craigslist and sending out a request on Freecycle. It turns out that they're not that uncommon, and that you can buy one for around $25-80.

I also had this vague notion that I'd seen a gumball machine in my grandparents' basement. I debated for a while whether or not I ought to call and ask, since it sounded crazy and I didn't want to confuse my grandmother with such an oddball request. I mean, how would that conversation go? "Hi Mom-Mom! I was wondering if you happen to have a gumball machine sitting around your house?" Finally I decided on sending an e-mail, and to my surprise, they did find a gumball machine in their basement!

They didn't know where it came from and they didn't have a key to open it up, but they said I was welcome to have it and any change inside. This morning I took it to a locksmith, and within a couple hours the lock had been picked and I had a new key to open it up.

Inside was a card from the Lions Club, a 10 cent sticker, one lonely leftover chiclet...

And 352 dimes! Enough to cover the cost of the locksmith and leave $11.99 profit! The shiniest of the dimes were from 1988, so I'm guessing it's been in my grandparents basement for 20 or more years.


Of course, the best part is that now I have a really fun way to display my bouncy balls at the Handmade Market in just over two weeks! The balls come in three sizes, and are $2 for the small balls, $4 for the medium, and $6 for the large. They make awesome stocking stuffers for both kids and pets.

By the way, when the Handmade Market is over, I'm going to make another batch of felted bouncy balls and use the gumball machine to decorate Annie and Laurel's room. Gumballs make everyone smile.

Fall Preview

My in-laws are coming tomorrow to visit us and to meet the baby (hooray!), so I might not be posting much for the next couple weeks. I wanted to leave you with a preview of finished projects to look forward to in the upcoming weeks as I prepare for the Christmas season. Think of these photos as "teasers" of what's to come.

More T-Yarn
You've already seen the t-yarn market bags and bag caddy, but I'll have some other new completed projects and project kits available soon. Look for T-yarn hair accessories, bracelets, and of course woven potholders! They're just like the ones you used to make with nylon loopies, except these don't melt when exposed to heat AND come from recycled materials. Win-win!

I'll also be offering make-your-own market bag kits from the t-yarn pictured above. They'll have approximately five balls of t-yarn in coordinating colors, and knitting instructions and tips for how to work with the t-yarn. Since each t-shirt only offers a small amount of yardage, selling kits makes more sense than offering individual balls of yarn.

Pop Tabs
Several friends have been saving pop tabs for me, and I've got some really cool projects lined up for them. Combined with plarn and/or t-yarn they're going to turn into cute flowered hair clips, get worked into those t-yarn bracelets, and hopefully many of them will end up as part of a plarn tote. This one by Cindy from MyRecycledBags has inspired me to try designing my own.

Spool Knitters
As a fiber artist, I'm always making new tools and gadgets for myself. I know lots of other crafty-type people also like nice handmade tools, so this year I'll be offering some really cool spool knitters. These are still in progress, but nearing completion. I can't wait to do a full post on them soon!

More Woven Straps
I'll be showcasing more items woven on my inkle loom, including this guitar strap made with tie-dyed cotton yarn and cassette tape. Look for card-woven pet collars soon too!

Hand-painted wool yarn
I have lots of recycled wool yarn already dyed and ready to be knit or sold as yarn, but I still have a basket full of undyed wool sweaters. Some of them will end up in the warm earthy tones of kool-aid dyes (like the yarn in the center of this photo), and others will be brighter colors from commercial dyes like the yarn I used for the polka-dotted alien hat.

Returning Favorites
Of course, I'll be bringing back many of the most popular items that I made last year, including felted bouncy balls made with my hand-dyed recycled wool yarns. All the balls pictured above are going to turn beautiful squishy colors and still keep their bounciness. Woohoo!

Handwoven Purse
This black purse is a collaboration between me and my sister. She wove the body of the bag on her treadle loom, and I will be weaving the other pieces on my inkle loom. It's going to be really gorgeous.

Tie-dyed Cotton Market Bags
Thanks to a tie-dying party my sister hosted this summer, I was able to dye five sweaters-worth of cotton yarn in brilliant self-striping colors. These yarns have worked their way into several projects, including these beautiful market bags.

So there you go. Lots of projects to look forward to, whether you are looking for inspiration for your own projects, looking to buy a great Christmas present, or just like looking at all the pictures. I know I'm looking forward to finishing and sharing these projects with you!

"Once there was a dear little girl whom everyone loved. Her grandmother loved her most of all and didn't know what to give the child next. Once she gave her a little red velvet cap, which was so becoming to her that she never wanted to wear anything else, and that was why everyone called her Little Red Cap."
-Grimm's Fairy Tales

Last year it took me until after Thanksgiving to finish knitting Annie a winter hat. This year I wanted to get it done early so my own daughter wouldn't have cold ears while I spent my time making hats for other people's children. A knitting design contest hosted by the yarn company Manos del Uruguay gave me the perfect opportunity to design and knit Annie a hat well before the first frost.

I designed Annie's hat to be reminiscent of the cap worn by Little Red Riding Hood from Grimm's Fairy Tales. However, since it was designed around yarn from Uruguay I named it "Poco Rojo" - Little Red in Spanish. It is both whimsical and practical - perfect for a little girl!

Annie hates to have hats constrict her ears, so I chose the vintage "pixie" style for this design. It is looser than most stocking caps, but still fits well around the head and has a chin strap to hold it on securely. Plus, it has an adorable curl in back!

The hat itself is a simple rectangle, grafted together at the back and with a neck band attached to the bottom. The red Manos Del Uruguay yarn was perfect for this project. The semi-solid coloring really highlights the cables, and they seem to shine even when there isn't any direct light on the hat. And the deep red really brings out the blue in Annie's eyes!

If the hat wins in the contest, the pattern will be available through Manos Del Uruguay. Otherwise, I might publish it as a free pattern here on my portfolio.

Suggested Retail: $25.

How's this for something different? "The Poppy" is a cloche-style hat made out of plarn from white shopping bags, red newspaper bags, and VHS tape! It was inspired by the crocheted pattern by Teresa Wooley, and makes for a really unique and fun fashion statement.

This hat will be one-of-a-kind, because to be honest, I hated working with VHS tape. It hurt my fingers and squeaked SO LOUDLY that you could hear me knitting from across a really big room. But I'm glad I soldiered through! VHS tape offers unrivaled sparkle, plus there's just a certain cool factor of wearing something made from so unlikely a material.

I really love the flower on the hat. I made it on a little flower loom, which I'm especially proud of because I made it all by myself. The loom itself is hideously ugly - it was a plastic jewelry case which looked nice until it got all ripped up when I drilled dozens of holes in it. I'll probably only put up pictures if Collin decides to build me a nice one and then I can show you how ugly the one I made for myself was. But it works, and I really like the resulting flower! It totally completes the look of this hat.

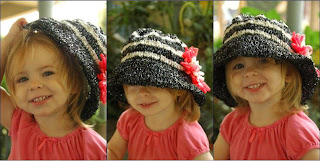
It is an adult-sized hat and doesn't fit Annie at all, but she was so adorable when she tried it on that I had to include pictures. Besides being a fun around-town hat for a woman, it would make a great dress-up hat for a girl!

Suggested retail: $30

Guitar Straps

The first time I saw guitar straps woven on an inkle loom I was inspired. Guitar straps are both useful and a perfect place to showcase your unique style. They also are a fairly simple shape that allows for a lot of variety in pattern and material. I wove the following four guitar straps to try out a few different techniques and yarns, and I love them all! Check them out!

This fiery strap is woven from recycled, hand-painted cotton yarn from an old sweater. I dyed it in stripes while it was still knit up in the sweater pieces, then unraveled it and wove this guitar strap. It is lightweight, flexible and smooth, yet still with the strength that comes from a warp-faced weave that you get on an inkle loom.

A more bulky version is this guitar strap woven from t-yarn. That's right, this one is made from recycled t-shirts! Unlike the other straps, I didn't have to dye the yarn to get these vibrant colors - each color came from a different t-shirt.

This close-up lets you see the texture of the woven t-yarn. It's very sturdy, and has a small amount of stretch that makes it comfortable to wear. Like all the other guitar straps, the end tabs are made from a recycled black leather jacket. Only the hardware is new!

This extra-long strap has two very neat features. It was card-woven, so it is a little thicker than the other cotton straps and features in intricate pattern unique to card-weaving. It also has a variegated yarn that was dyed in a rainbow, which makes the pattern shift from red to orange, yellow, green, blue, and purple as your eye travels down the length of the strap. It is made from recycled wool yarns, and is perfect for taller guitarists who need a longer strap.

Finally, my favorite one is woven from hand-dyed recycled purple and green cotton/acrylic blend yarn along with cassette tape. The cassette tape gives the strap a really fun retro feel, as well as an amazing sparkle. I love the effect and am looking forward to using it again in another guitar strap with a different color combination.

(By the way, when I say this one is my favorite, I mean that I couldn't bear to take it off my guitar after we were done taking photos this morning. It's still hiding in my guitar case, and I'm seriously considering weaving another one to sell, just so I can keep this one. It's so cool.)

All the guitar straps are 2 inches wide, and all except the rainbow-patterned one are the standard size of 30-60 inches. The extra-large size gives you another 6 inches, adjusting from 36-66 inches.

Suggested Retail: $30

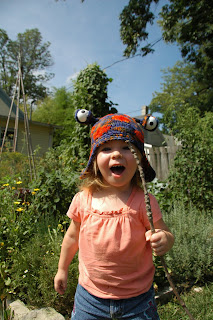
Sometimes I dye yarn for a specific project, and sometimes I just come up with a fun color combination and the yarn tells me what it wants to be. This alien hat was the latter. I was trying out some new dyes, and the yarn came out brighter and darker than I'd expected. It was a really fun kid-themed colorway that screamed, "Make me into a polka-dotted alien hat!"

The hat is knit out of recycled, hand-painted wool warn. There are short pieces of a bamboo chopstick completely enclosed in knit tubes to stiffen the eyeballs. The eyeballs are ping-pong balls, securely glued into the wool eye sockets.

This hat will fit a toddler or a young child, with a head circumference of approximately 18-19.5 inches. My glass model has an adult head circumference of 22 inches and the hat is too small for it, I just had trouble getting Annie to model a wool hat for more than a minute in the summer heat. But come winter, this hat will make some toddler a very cool (yet very warm) winter hat!

Suggested Retail: $20

My New Inkle Loom

I am so excited to finally be able to share these pictures with you! This summer my husband Collin built me a really gorgeous inkle loom so that I can weave straps and bands. Like I mentioned a couple posts ago, straps are one of knitting's weakest points and inkle/card weaving is a perfect complement to knitting. The straps are all tightly woven, strong, and beautiul.

Collin based the design of this loom on one built by British woodworker Michael Williams. If you were going to buy a loom like this you'd need about $300, and since that wasn't really in our budget (and because Collin likes a challenge and something he can build with his hands), Collin agreed to make me one himself.

Collin used some beautiful hardwood scraps from my Granddad's wood shop: cherry for the main crescent shape, and walnut for the base and the inkle shuttles (not pictured here). The dowels are oak and the tensioner and support pieces are hickory. He used walnut wedges to firmly secure the dowels, since they can be under significant strain during weaving.

I'm using this loom for two different but related weaving techniques: inkle weaving (the traditional use for a loom like this) and card weaving, an even older technique which can be done without a loom but works a lot better on one. Both techniques produce very strong warp-faced bands, which means that the only strings that show are the long vertical ones. Card weaving uses a set of square cards to separate the strings, and can produce a huge array of thick, intricately patterned bands.

Inkle weaving, on the other hand, uses string "heddles" to separate the strings, and results in a slightly lighter-weight woven fabric. This is very important when you're weaving with a heavier thread, like t-yarn, or something more delicate like the cassette tape in the guitar strap above.

The shuttle in all these pictures is an old one Collin made for my frame loom. He made me some new inkle shuttles from walnut that have a sharpened edge for beating the strings open, but I haven't been able to get pictures of them yet. Before he finished the inkle shuttle I had to borrow Annie's toy chef knife to do the same job!

In a couple days I hope to be able to show you some finished guitar straps that I've woven on my loom. I also recently bought the hardware to make some dog and cat collars, so watch for some very neat pet collars to show up soon. I can't wait to work more on my new loom and show ya'll the results!


Meet Laurel Catherine, our baby girl! She was born last week, August 11th, at 9:24 in the morning, weighing 6 lb 14 oz and 19 in. long. We are praising God for her safe and uncomplicated arrival!
Almost-two-year-old Annie loves her baby sister Laurel! It's so sweet to see them together.
Laurel is named after her grandmother Catherine, and after the beautiful mountain laurel flowers that grow in the Smoky Mountains. My husband and I have loved the name ever since we honeymooned in the Smokies, and decided we'd name our second daughter Laurel when we were vacationing in Tennessee again this spring. After she had a name, I wanted to make her a hat inspired by a laurel flower.


To save you the trouble of Googling to find out what a laurel flower looks like, here is the one on which I based my design. I also made Laurel a matching set of booties that should fit this winter (look for pictures of those later), and I am planning on making a pacifier clip in the same color scheme. The pacifier clip was one of the things still on my to-do list when Laurel showed up a week early. Since baby snuggles are sweeter than having everything checked off my list, I'm not complaining.

Suggested retail: $15 for a newborn-sized hat like this one. I could make it to resemble a variety of cup or bell-shaped flowers. You'll have to supply your own baby, though, because I'm keeping this one!

About Me

My photo
I'm a follower of Jesus Christ, help-mate of Collin, and mother to Annie, Laurel, and Jenny. This blog contains a bit of my fiber arts portfolio. With three young children, I'm currently out of the selling business, but I hope to re-launch this blog in the next few months as a personal fiber-arts blog.

About this blog

This blog contains photos both of things for sale through my crafts business, Seasonal Arts, as well as gifts I make for my family and friends. On most projects I have also posted a suggested retail price. If you see something which catches your eye, feel free to send me an e-mail at:

mama.hobbit.arts[at]gmail.com

I would love to make something for you!

Blog Archive